Most of us are aware that ODBC drivers are the most used connectivity option on Linux when you want to connect to non-Oracle databases. As the Oracle databases are mostly connected by using the Oracle client installation or Default configuration available as part of the installation of the application, in any case, tnsnames.ORA will hold the database details as required.
Similarly, for ODBC we have two files odbcinst.ini and odbc.ini, each having its own purpose. For now I'm considering that we are on Red Hat Linux and the ODBC manager used is unixODBC 2.3.1
Find OS Version on RHEL using the below command
cat /etc/redhat-release

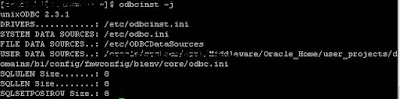
Find the default ODBC Manager version and where it is setup use below command
odbcinst –j
odbcinst.ini
This initialization file will have the details of the drivers that are available on the server, for example, the default ones are as below.
[PostgreSQL]
[MySQL]
You can get the drivers available in the file by using the below command.
odbcinst –q –d
Let’s say you want to configure Amazon RedShift drivers on the server, first step is to install the driver on the server after the installation add the below to the odbcinst.ini file
[RedShiftDB]
Description=Amazon Redshift ODBC Driver (64-bit)
Driver=/opt/amazon/redshiftodbc/lib/64/libamazonredshiftodbc64.so
Once we add this and run the odbcinst –q –d command we will now see below drivers
[PostgreSQL]
[MySQL]
[RedShiftDB]
ODBC.ini
This is the file where we actually configure the DSN with server details of the database’s we intend to connect or access from the Linux server.
In our Amazon RedShift case add the below with your respective details.
[RedShiftDB]
Description=Amazon Redshift ODBC
Driver=/opt/amazon/redshiftodbc/lib/64/libamazonredshiftodbc64.so
ServerName=abcdefgh.redshift.amazonaws.com
Port=5439
Database=redshiftdatabase1
locale=enUS
QueryTimeout=2000
ProxyHost=
ProxyPort=
We can verify the sources from the odbc.ini file using the below command
odbcinst –q –s
we can see the below output
[RedShiftDB]
Now it’s time we set these files as the system variables in bash_profile so that they work as expected,
OBDCINI – location of odbc.ini
AMAZONREDSHIFTODBC – location of file amazon.redshiftodbc.ini
LD_LIBRARY_PATH – library paths where your ODBC manager has installed, ex. /usr/lib64/
See the below examples
export ODBCSYSINI=/shared/odbc
export ODBCINI=/shared/odbc/odbc.ini
export AMAZONREDSHIFTODBCINI=/shared/odbc/amazon.redshiftodbc.ini
export LD_LIBRARY_PATH=/usr/lib64/:$LD_LIBRARY_PATH
Now lets test this using the isql command. This will help us to connect to anyof the DSN we added in odbc.ini, the command can be used as below
Isql –v RedShiftDB username password
Similarly, for ODBC we have two files odbcinst.ini and odbc.ini, each having its own purpose. For now I'm considering that we are on Red Hat Linux and the ODBC manager used is unixODBC 2.3.1
Find OS Version on RHEL using the below command
cat /etc/redhat-release
Find the default ODBC Manager version and where it is setup use below command
odbcinst –j

odbcinst.ini
This initialization file will have the details of the drivers that are available on the server, for example, the default ones are as below.
[PostgreSQL]
[MySQL]
You can get the drivers available in the file by using the below command.
odbcinst –q –d
Let’s say you want to configure Amazon RedShift drivers on the server, first step is to install the driver on the server after the installation add the below to the odbcinst.ini file
[RedShiftDB]
Description=Amazon Redshift ODBC Driver (64-bit)
Driver=/opt/amazon/redshiftodbc/lib/64/libamazonredshiftodbc64.so
Once we add this and run the odbcinst –q –d command we will now see below drivers
[PostgreSQL]
[MySQL]
[RedShiftDB]
ODBC.ini
This is the file where we actually configure the DSN with server details of the database’s we intend to connect or access from the Linux server.
In our Amazon RedShift case add the below with your respective details.
[RedShiftDB]
Description=Amazon Redshift ODBC
Driver=/opt/amazon/redshiftodbc/lib/64/libamazonredshiftodbc64.so
ServerName=abcdefgh.redshift.amazonaws.com
Port=5439
Database=redshiftdatabase1
locale=enUS
QueryTimeout=2000
ProxyHost=
ProxyPort=
We can verify the sources from the odbc.ini file using the below command
odbcinst –q –s
we can see the below output
[RedShiftDB]
Now it’s time we set these files as the system variables in bash_profile so that they work as expected,
OBDCINI – location of odbc.ini
AMAZONREDSHIFTODBC – location of file amazon.redshiftodbc.ini
LD_LIBRARY_PATH – library paths where your ODBC manager has installed, ex. /usr/lib64/
See the below examples
export ODBCSYSINI=/shared/odbc
export ODBCINI=/shared/odbc/odbc.ini
export AMAZONREDSHIFTODBCINI=/shared/odbc/amazon.redshiftodbc.ini
export LD_LIBRARY_PATH=/usr/lib64/:$LD_LIBRARY_PATH
Now lets test this using the isql command. This will help us to connect to anyof the DSN we added in odbc.ini, the command can be used as below
Isql –v RedShiftDB username password
No comments:
Post a Comment