Saturday, February 21, 2015

OBIEE 11g : nQSError 75027 Failed to open connection to SMTP Server

We have faced an issue when we created an agent and trying to see if its running properly.It runs fine and suddenly displays a message saying

                                   Eventually succeeded, but encountered and resolved errors...
                                   Number of skipped deliveries: 1 of 2

                                    AgentID: /users/weblogic/AgentExample
        [nQSError: 75027] Failed to open connection to SMTP Server (host stbeehive.oracle.com;                                    port 465).                                  
                                   ...Trying SMTP Delivery loop again... Sleeping for 8 seconds


 This message keeps coming no matter what we do, we have checked the SMTP details and they are fine.at last we found a solution.This comes only in case of Mozilla Firefox (at-least for us). Follow the steps and you will be good.

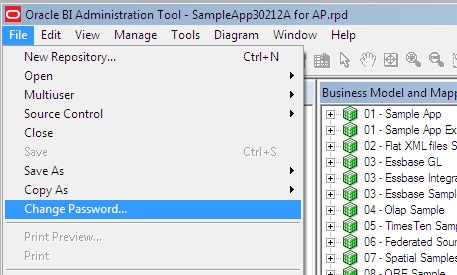
Step 1 :  Mozilla Firefox --> Options --> Advanced Tab -->  Certificates --> View Certificates.


Now find the below three in the list and export them into a folder.

                                    VeriSignClass3InternationalServerCA-G3.crt
                                    VeriSignClass3PublicPrimaryCertificationAuthority-G5.crt
VerisignClass3PublicPrimaryCertificationAuthority.crt


Step 2: Now login to EM --> Business Intelligence--> Coreapplication--> Deployment --> Mail

Under the SSL section make changes as below.I have given my case below.

Connection Security -- SSL/TLS


Save and restart the services. and now you should see the agent running perfectly

Tuesday, February 17, 2015

OBIEE 11g : Creating Node Manager as Windows Service

As we all know OBIEE runs on Weblogic server which was introduced by Oracle along with OBIEE 11g Version, so its pretty obvious that before we start OBIEE components we have to make sure Weblogic is running or the BI components wont start.

We have a sequence in which the components have to be started which are taken care in windows servers with a single click , Thanks to Start BI Services Icon. however we have a sequence lets look into it.

1) Weblogic Server as its the Host for all components
2) Node Manager(It is by default windows service in Enterprise Installation of OBIEE 11G)
3) Managed Servers(Comes with Enterprise Installation of OBIEE 11G) 
4) BI System Components ( BI Server, Presentation Services, Java Host, Cluster Controller, Scheduler etc..)

Lets see how can we deploy the Node Manager as Windows Service.

Step 1: 

Find and edit the nodemanager.properties file in the below location. 

[ORACLE_HOME]\wlserver_10.3\common\nodemanager


Find the below parameters CrashRecoveryEnabled and StartScriptEnabled change them to true as shown.


Step 2:

Now go to the below location [ORACLE_HOME]\wlserver_10.3\server\bin and run the file installNodeMgrSvc.cmd  which should create a windows service with name as below


                Oracle WebLogic NodeManager (PATH_TO_DOMAIN)

the same can be seen in the image.


Monday, February 16, 2015

OBIEE 11g : The Connection has Failed Error

If your'e working with OBIEE then you can't deny facing the issue "The connection has failed". The most common issue faced by almost everyone when we are trying to use import metadata option.


It clearly stated that it is not able to connect or what ever we have given is not helping the application to establish a connection with the database. So if your'e using a OCI interface then you must be doing the only thing wrong. Your'e not pointing the interface to proper directory with connection descriptions i.e. tnsnames.ORA file.

Resolution: We must point the interface to the proper directory by passing the path using a environment variable.


Path to Environment Variables Menu:

My Computer --> Properties --> Advanced System Settings --> Environment Variables


click New to add a new variable as TNS_ADMIN variable. The value needs to be the path to your tnsnames.ora file, typically located at [ORACLE_HOME]\network\admin. The path will look something like the value shown below (it depends on where Oracle is installed on your system).


Hope this helps !!!


OBIEE 11g: Customizing Prompt ‘All Column Values’ to Custom Value

The requirement is to have a custom prompt value which will in turn hold all the prompt values. We mean to say All Column Values with new name. This looks simple but practically this is impossible to do. We have identified a way to achieve this in some scenarios i will explain one here.

We have a Prompt which holds the values of States in USA , now when we want to show all the values of USA (All States) we may have to select All Column Values or individually select all the values. Second is pretty bad idea as it makes no sense to select hundreds of column values. The first one is the apt but the client is looking for something different.

We need to show National instead of All Column Values as shown below.


Now lets see how this can be done.We have to build a new group as per our requirement as shown below. For this create a report which contains column that you are going to prompt and create group here with the name you need.


Provide the label as required , my case National and copy all the elements under it as shown below..


Now save the selection steps as shown below in some folder as this is where you will be finding it for use. Also select if it is going to be saved statically or dynamically, just in case if any future elements are added.


Now go to edit the prompt and include the group as shown below.


Click the Green Plus symbol to add the desired group from the saved location.


Now you can go ahead and use it as if it is a general column value.

OBIEE 11g : Trellis Chart

The name Trellis Charts will not give a good insight of what exactly this does in OBIEE. Simply speaking these are charts in grids. That is graphs in table cells or pivot cells that display matrices of measures with each cell in the matrix containing a micro chart,

Let us now build a simple Trellis Chart, which allow you to select any graph type for each chart cell, the sales is shown by product category. Perform steps as below.

1.Create a new analysis, With 3 or 4 columns. I have taken the Sample Sales and added columns as shown below.


2.Go to Results tab by default we can see the table view as below.


3. As always since we are looking for Trellis chart , add one from new view icon as show below. For now we will choose simple Trellis view.


4. Save the analysis with some name, My case I am saving as My Trellis View 


5. Click the Edit View icon of the Trellis view to go to the view adjustments. You can see the alignment difference from other views.


6.Arrange the measures and dimensions as required, for example refer below.


7. Now your Trellis view looks something like below. You can do several customizations as per your need.


This post is to get you familiarized with the Trellis views. You can play around to understand the complex views.

Saturday, February 14, 2015

OBIEE 11g : Shared logon in Connection Pool

Recently we have faced an issue where we got the error invalid username/password this has happened randomly on one morning and every user has same error.

We have tried the username/password directly on database and it is working fine but its not working with OBIEE. The connection pool is also having the same username/password.We didn't know what went wrong.

When we started debugging we came to know that the DSN used was having a username/password which was delimited as part of DB maintenance activity as it is no longer used. But how come it is responsible for our issue, because we are using the latest username/password.

Resolution for this was to enable Shared Logon


Select this option if you want all users whose queries use the connection pool to access the underlying database using the same user name and password.

If this option is selected, then all connections to the database that use the connection pool use the user name and password specified in the connection pool, even if the user has specified a database user name and password in the DSN (or in user configuration).

If this option is not selected, connections through the connection pool use the database user ID and password specified in the DSN or in the user profile.

OBIEE 11g : Change repository password from RPD

Administration tool has an option to change the password once you feel it has been compromised with too many people, we can do this by opening the RPD in Administration tool using the current password.

 Now, once it is open go to File --> Change Password as shown below.


Just enter the Current Password , and then the new password and confirm the same by re entering it.
Click OK and your'e done.


Be careful while uploading this to the server. you should use the new password in the EM.

Tuesday, February 3, 2015

OBIEE 11g: Configure Lookup Table in RPD

Lookup table is a new feature in OBIEE11g.

Uses of Lookup Table

• Resolve code columns and get description/name values from a lookup table.
• It can also be used for checking the currency conversion values from a daily updated source.

There are 2 types of lookup tables.

Sparse Lookups – A sparse lookup basically means that the main driving table does not
necessarily have corresponding lookup values in the lookup table for all the id values. This can be
considered to be an equivalent of a Left Outer Join.

Dense Lookups – A dense lookup basically means that the main driving table will have matching
lookup values in the lookup table for each of its unique id value. This can be considered to be an
equivalent of an inner join.


Below are the screenshots of the steps with instructions mentioned. Hope you get what you're looking for.


OBIEE 11g Step by Step Installation with screenshots

Lets continue with OBIEE 11g as we are done with Database and RCU in our previous posts.


Download the OBIEE 11g version from here or from oracle e-delivery site and extract all the four disk into a single folder and click setup.exe from the Disk1

Universal Installer window will start and will check for the initial set up and system requirement.


After the successful precheck the first step of our OBIEE 11.1.1.7.0 starts with the below window. Just Click 'Next'


Step2:
If you have oracle Support username and password then update then use that in this step or just select first option 'Skip Software updates' and click 'Next'


Step3:
Select the appropriate installation step here. I am going to install all the component of BI so selected here 'Enterprise Install' and then click 'Next'


Step4:
This step will just check operating system certification and physical memory. Just click 'Next' after the check passed through


Step5:
As It is a new installation, select the option 'Create New BI System' and type password for weblogic User.
Note: Save or remember the password because this is the password going to be used to access BI system, EM, Console and answers later on..
and then click 'Next'


Step6:
In this step we have to select the actual folder where we want to install BI 11g. So here I have created an folder in C:\ driver and selected here by browsing the home location in this window. Remaining boxes will be automatically filled once we selected the home location then click 'Next'


With the above window we will get warning like below screen. Just Click 'Yes and click 'Next' with the above screen


Step7:
In this step we would know what are the components going to be installed. If you are really going to user 'RTD' and Essbase Suite the leave it selected or Just uncheck with the below screen and click 'Next'


Step8:
In this step we have to select the database where we have installed our RCU. I have done in oracle database so selected the oracle database in database type

Connection String: dbservername:portnumber:servicename
BIPLATFORM Name: DEV_BIPLATFORM
BIPLATFORM Pwd: Admin123

Note: This username and password would be same which we have given when we installed RCU


Step9:
Same steps like the previous step but here with DEV_MDS username and password. After entering all the details just click 'Next'


Step10:
Just Select 'Auto Port Configuration' if you want to install with the default port numbers that oracle do the installation and then click 'Next'


Step11:
If we have oracle support email id we could mention with this step or just deselect the option click 'Yes' with the warning screen and click 'Next' with the below step


Step12:
With this step just click 'Install' so that the actual installation will be started with the below screen:

Step13:
Just watch the installation progress with this step


It take a while even the progress bar shows 100%. Post installation script might be take some time so be patient the steps will pass through.


Step14:
After successful installation the configuration steps will start. It takes a while to finish all the configuration so wait to finish and then just click 'Next' when the configuration shows 100%


Step15:
So actual installation and configuration are over with the above step. If you want to save the path details for middleware home, domain home and others click 'Save' with the below screen and save it in a file for reference. and the just click 'Finish' to complete the installation.


Now browse through the answers, EM and console and Play with BI.